How to Take Care of Your Car’s Exterior at Home
How to Take Care of Your Car’s Exterior at Home
Car exterior care mainly involves regular washing, safe drying, contamination removal, paint protection and seasonal maintenance. Start by rinsing away loose grit, use paint-safe products, wash from the roof downward and dry with clean microfiber towels. This routine helps reduce surface contamination and wash-related marks without replacing professional paint repair.
This step-by-step guide explains what to buy, how to prepare the washing area, how to use the two-bucket car wash method, how to remove bird droppings and tree sap, and when home maintenance should stop. You will also learn how to choose between wax, sealant and ceramic spray products while avoiding techniques that can damage paint, trim or special finishes.
Quick Summary
🧼 Rinse first and wash from top to bottom so loose grit does not get rubbed across clean paint.
🪣 Use separate tools for wheels and bodywork, plus a wash bucket and a rinse bucket.
💧 Dry promptly with clean microfiber to reduce mineral spotting and water marks.
🛡️ Use wax, sealant or ceramic spray only on clean, dry paint, and seek professional help for deep damage.
Why Regular Exterior Car Care Matters
Car exterior care is a maintenance routine that removes contamination and adds temporary protection to painted and unpainted exterior surfaces. Road salt, brake dust, insects, bird droppings, tree sap, ultraviolet exposure and mineral deposits can make the surface harder to clean and may contribute to staining or finish deterioration when left untreated.
Routine washing is not the same as paint correction. Cleaning removes loose and bonded contamination, while protection adds a temporary layer that can improve water behavior and make future washing easier. Paint correction and repair address defects such as deep scratches, etched stains, severe oxidation or clear-coat failure.
Regular washing can reduce contamination and wear, but careful maintenance cannot repair deep scratches or failing clear coat.
What Exterior Maintenance Can and Cannot Fix
A clean surface may look significantly better after safe washing, but appearance alone does not prove that the paint is undamaged. A mark that remains after gentle cleaning may be bonded contamination, mineral etching, oxidation or a defect inside the clear coat.
- Cleaning removes loose dirt, road film and some bonded contamination.
- Waxes, paint sealants and ceramic sprays provide temporary protection rather than permanent repair.
- Deep scratches, exposed metal, peeling clear coat and severe oxidation need an assessment beyond routine washing.
Stop increasing product strength or polishing pressure when a defect does not respond to safe cleaning. Aggressive correction can remove paint or clear coat, especially when the material thickness and finish condition are unknown.
Car Exterior Care: The Essential Tools and Products
The safest beginner setup separates products by surface. Painted panels need a soft wash mitt and clean drying towels; wheels and tires need dedicated brushes; glass requires a lint-free towel; and exterior trim needs a compatible plastic or rubber product.
A hose is useful for pre-rinsing and final rinsing, while a pressure washer can remove loose grit when used at a safe distance. A wheel brush, tire cleaner, spray wax or paint sealant is optional rather than essential. Always check compatibility with clear coat, matte paint, satin finishes, chrome, plastic, wraps and wheel coatings.
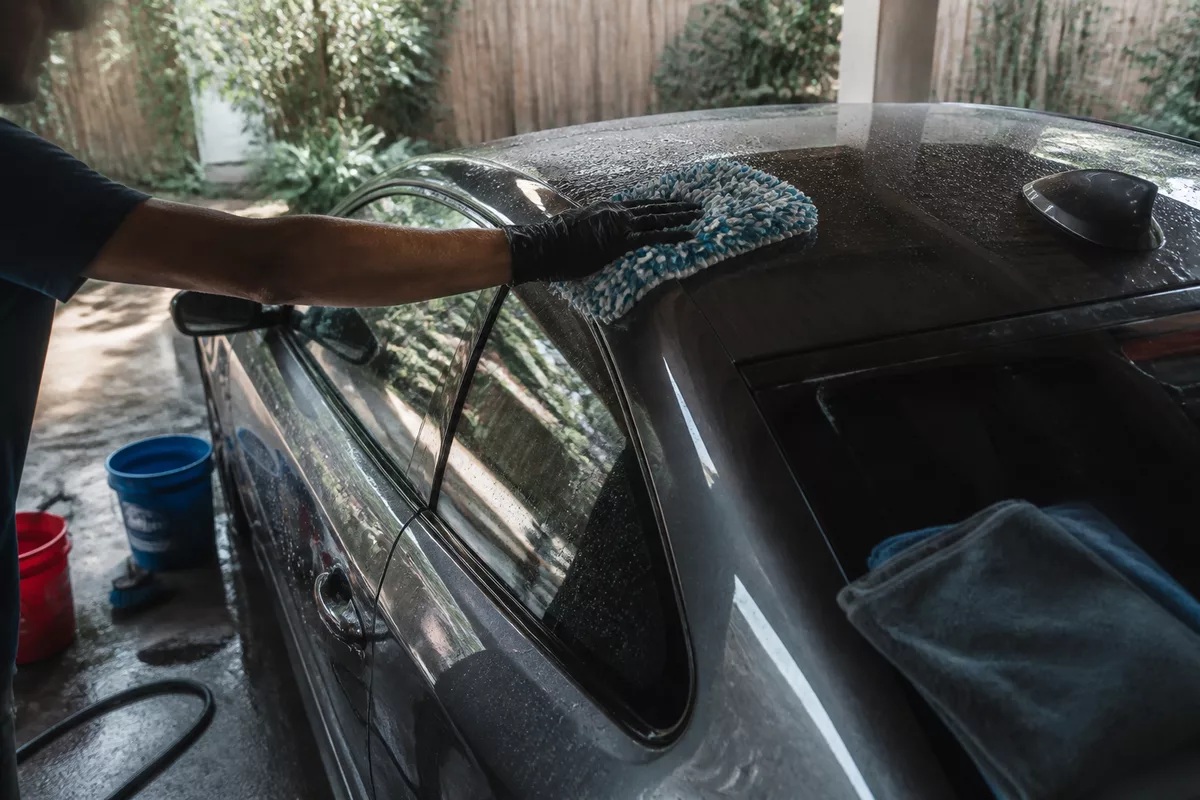
The most important car washing equipment is not the most expensive product; it is a clean, well-separated set of tools used in the correct order.
A Beginner-Friendly Car Cleaning Kit
A practical kit can remain simple. The goal is to control contamination and reduce friction rather than collect every detailing product on the market.
- Two wash buckets, with grit guards if available.
- pH-balanced automotive shampoo, a soft wash mitt and dedicated wheel brushes.
- Separate microfiber towels for paint, glass, wheels and tires.
- An absorbent drying towel or suitable air blower.
- Automotive glass cleaner and a suitable tire dressing.
- Optional products such as tar remover, iron remover, clay lubricant, spray wax or paint sealant.
Product ratings, marketplace rankings and durability claims can change over time. Treat those details as buying information rather than proof that a product will perform identically on every vehicle, paint system or climate.
Products and Tools to Avoid
Do not use dish soap as a regular car shampoo, abrasive sponges, household solvents or untested acidic wheel cleaners. A product designed for a household surface may dry aggressively, affect protection or create marks on automotive finishes.
Never use one contaminated towel across wheels, tires and painted bodywork. Wheel dust can contain abrasive particles, and transferring that material to paint increases the risk of visible wash marks.
Prepare the Car and Washing Area Safely
Choose shade or a cool part of the day before starting car exterior care. A cool surface gives shampoo and chemical cleaners more time to work before drying, which reduces streaks and concentrated residue.
Check local rules about driveway washing and water runoff, particularly where dirty water may enter a storm drain. Avoid strong wind, freezing conditions and washing on a hot surface whenever possible. Inspect the car first so fragile trim, matte finishes, existing scratches and fresh contamination are visible before water reaches the panels.
Before You Start
- Allow the wheels and body panels to cool.
- Set out clean tools before wetting the vehicle.
- Prepare separate equipment for wheels, tires, glass and painted surfaces.
- Keep pressure-washer spray away from seals, badges, sensors and damaged paint.
- Plan a top-to-bottom workflow so dirty water does not return to clean areas.
Take a few minutes to identify bird droppings, tree sap, insects, tar and water spots before washing. Fresh contamination can often be softened and lifted safely, while older marks may require a dedicated cleaner or professional assessment.
How to Wash a Car at Home: The Correct Step-by-Step Process
To wash a car at home safely, pre-rinse the exterior, clean the wheels and tires separately, wash the body with the two-bucket method, rinse thoroughly and dry without dragging heavy dirt across the paint. Work in small sections from the roof downward, rinsing the mitt frequently.
The sequence matters because lower panels and wheels usually carry the heaviest contamination. Keeping those areas until later reduces the chance of moving gritty water onto cleaner upper panels.
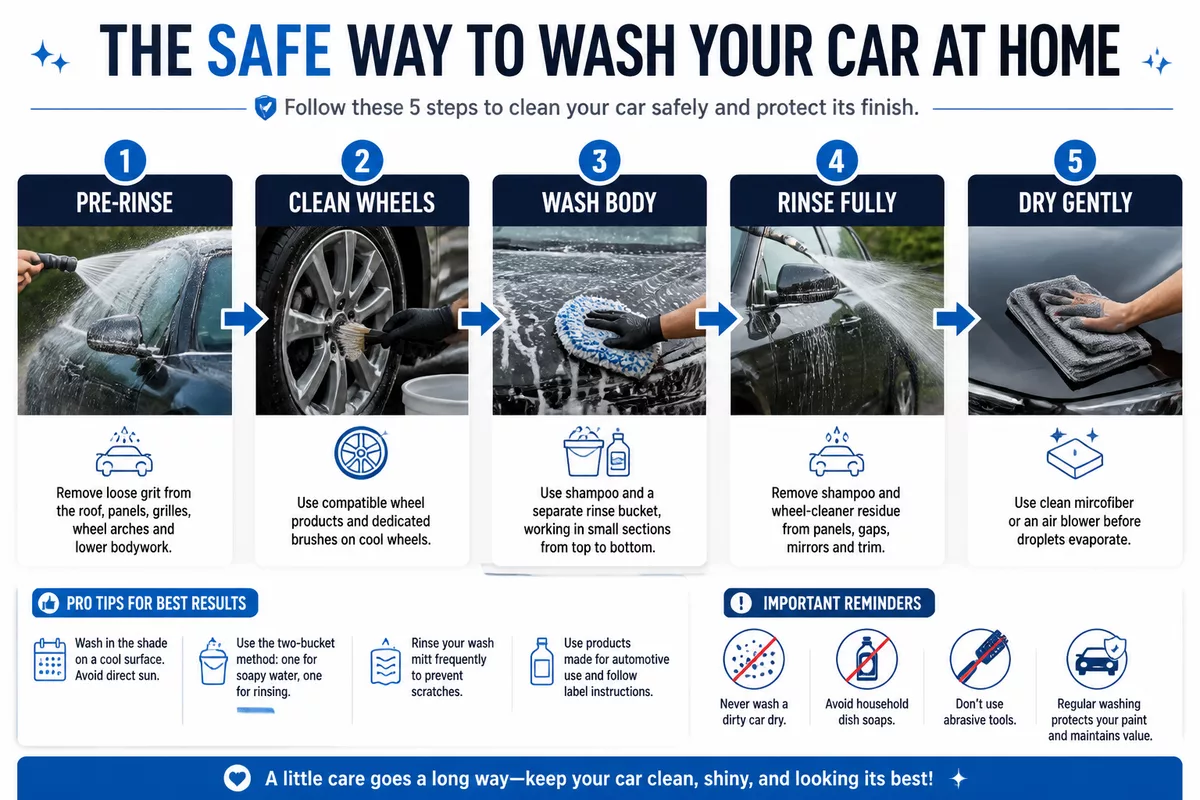
Step 1: Pre-Rinse the Exterior
Rinse from the roof toward the lower panels to remove loose grit before making contact with the paint. Pay attention to wheel arches, grilles, panel gaps and lower bodywork, where road film commonly accumulates.
A pressure washer can help with pre-rinsing, but keep the spray at a safe distance and never concentrate it on seals, damaged paint, badges or sensors. The aim is to loosen contamination, not force water into vulnerable areas.
Step 2: Clean the Wheels and Tires First
Work on cool wheels with a cleaner compatible with the wheel finish. Use dedicated brushes, clean one wheel at a time and rinse thoroughly before the product dries.
Clean tire sidewalls separately and apply tire dressing sparingly. Keep dressing away from the tread, brake components and painted panels because excess product can spread or create an unwanted slippery surface.
Step 3: Use the Two-Bucket Car Wash Method
Fill one bucket with the shampoo solution and another with clean rinse water. Dip the wash mitt into the shampoo, clean one small section with light straight passes, then rinse the mitt before returning it to the shampoo bucket.
Start with the roof and glass, then move down through the upper panels. Leave the lower panels for last and replace visibly contaminated water. Keep wheel and bodywork tools completely separate throughout the wash.
Rinsing the mitt after each section is a simple way to reduce the amount of grit being moved across the paint.
Step 4: Rinse Thoroughly
Rinse from top to bottom, including badges, mirrors, handles, trim and panel gaps. Remove every trace of shampoo and wheel-cleaning residue before beginning the drying stage.
A gentle final rinse may reduce the amount of water left on the surface, but it does not remove the need for careful drying. Mineral-rich water can leave marks when droplets evaporate.
Car Drying Techniques That Help Prevent Water Spots
Use a clean, absorbent microfiber drying towel or a suitable air blower after rinsing. Patting or gently gliding the towel is safer than dragging a heavy, contaminated cloth across the paint.
Water spots form when droplets evaporate and leave minerals behind. Mineral-rich water and hot panels increase the chance of visible deposits, so dry the car promptly in shade whenever possible.
A Safe Drying Sequence
- Start with the upper painted panels and glass.
- Use separate towels for wheels and painted surfaces.
- Dry mirrors, emblems, grilles, handles and panel gaps to prevent later drips.
- Inspect the vehicle in changing light for droplets or streaks.
- Wash and store microfiber towels separately without fabric softener.
Replace a towel when it becomes visibly dirty or saturated. A clean towel used on a clean panel is more important than applying extra pressure to absorb the last droplets.
How to Remove Bird Droppings, Tree Sap and Other Stubborn Contaminants
Fresh bird droppings, insects and tree sap should be softened before removal. Cover the deposit briefly with a damp microfiber towel or use a compatible automotive cleaner, then lift gently instead of scraping or rubbing the material dry.
Road salt, tar and iron fallout may need dedicated chemical decontamination. Follow the product instructions, respect the stated dwell time, prevent the product from drying and rinse or rewash the treated area afterward.
Bird Droppings, Bugs and Tree Sap
Place a damp towel over the contamination and allow it to soften. Lift the material with minimal pressure, moving to a clean part of the towel as needed.
Do not use fingernails, abrasive pads or dry rubbing on the paint. Persistent staining may indicate etching rather than contamination sitting on top of the clear coat.
Tar, Road Salt and Iron Fallout
Use a dedicated tar remover or iron remover that is compatible with the affected surface. Apply the product only as directed and avoid using a stronger chemical simply because the first attempt was slow.
Road salt deserves extra attention during winter. Rinse lower panels, wheel arches and the underside of the vehicle regularly according to local conditions, because salt and road grime can accumulate in areas that are easy to overlook.
Hard-Water Spots and Etching
A suitable water-spot remover may help with fresh mineral deposits. Washing alone will not remove every mark, especially when minerals have etched into the clear coat.
Stop home treatment when spots remain after safe cleaning, or when the surface shows oxidation, peeling or uneven gloss. Professional correction may be more appropriate than repeated chemical applications.
Protect the Paint After Cleaning
Spray wax, paint sealant and ceramic spray products are protective maintenance options applied to clean, dry surfaces. A clay bar is different: it removes bonded contamination with lubrication but does not provide paint protection by itself.
Protection durability depends on the product, preparation, application conditions, vehicle use, washing routine and environment. Follow the manufacturer’s instructions for curing, removal and maintenance rather than treating a general durability claim as a guarantee.
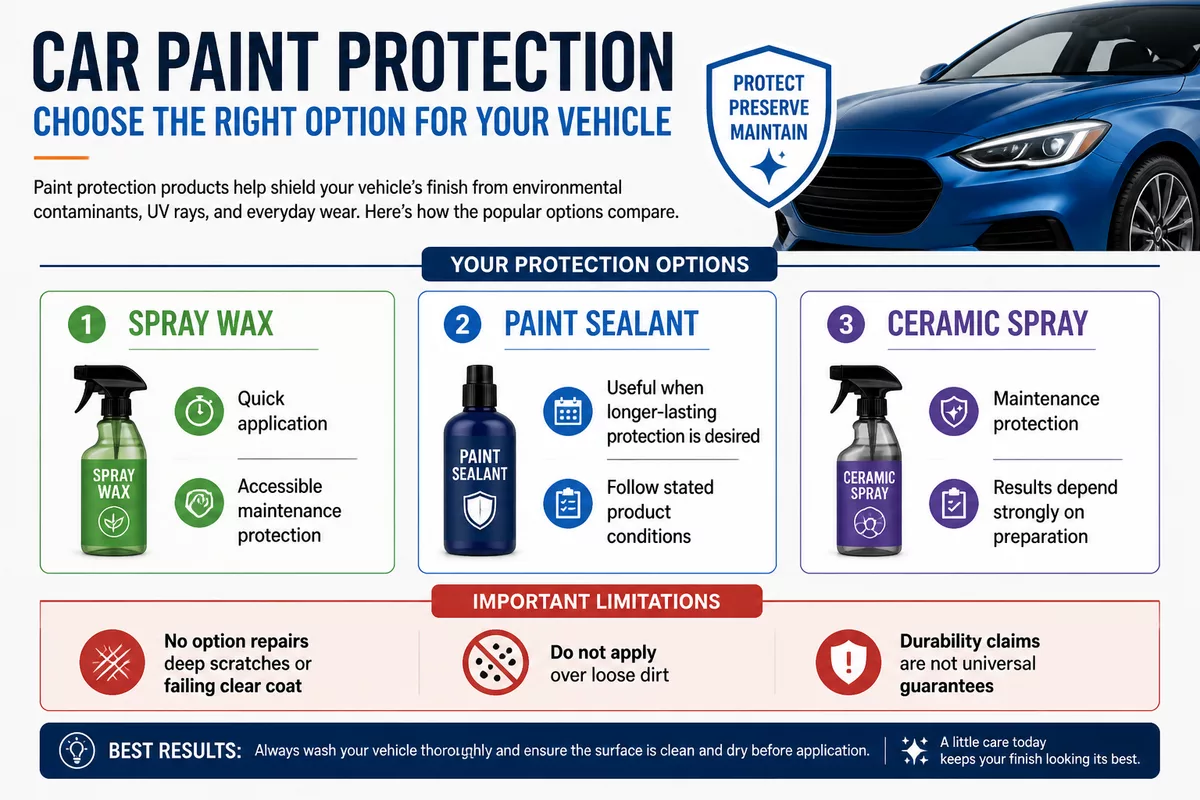
Spray Wax and Paint Sealant
Use spray wax when you want a quick, accessible layer of gloss and water repellency. Choose a paint sealant when the product’s stated conditions suit your maintenance goals and you are prepared to follow its application and removal instructions.
Apply either product to small areas and remove residue before it dries or hazes excessively. Never apply wax or sealant over loose dirt because the product can lock contamination against the surface.
When to Use a Clay Bar or Ceramic Spray
Use a clay bar only when washing leaves the paint feeling rough because bonded contamination remains. Provide sufficient lubricant, use gentle pressure and stop immediately if the clay is dropped or becomes contaminated.
Ceramic sprays should be treated as maintenance protection rather than permanent professional coatings. Preparation and application conditions strongly influence the finish, so test compatibility and follow the product directions on an inconspicuous area when appropriate.
Care for Glass, Plastic Trim, Chrome and Special Finishes
Glass, plastic trim, chrome and painted panels do not always tolerate the same products. Use automotive glass cleaner with a clean, lint-free microfiber towel, and choose exterior-trim products designed for unpainted plastic or rubber.
Matte and satin finishes need particular care because polishing can create uneven gloss. Wraps, coated surfaces and delicate chrome should be tested for compatibility before any cleaner, polish or protection product is applied.
Surface-Specific Precautions
- Keep tire dressing away from brakes, tread and painted panels.
- Avoid polishing matte or satin finishes because polishing may create glossy patches.
- Use non-abrasive products on chrome and delicate trim.
- Do not use abrasive compounds on trim or chrome without confirming that the finish allows it.
- Clean glass with a dedicated product and a towel that has not touched tire dressing or wheel cleaner.
Undercarriage rinsing is particularly useful after exposure to salt or heavily contaminated roads. Use a method that reaches the area safely and avoid placing yourself under a vehicle supported only by a jack.
Common Exterior Car Care Mistakes to Avoid
Most avoidable paint marks come from combining heat, contamination and unnecessary friction. A safe car exterior care routine removes loose dirt before contact and keeps tools clean throughout the process.
- Washing in direct sun or allowing shampoo and chemicals to dry.
- Skipping the pre-rinse and rubbing grit into the paint.
- Using dirty towels, one bucket or the same tools for wheels and bodywork.
- Applying wax or sealant over loose dirt.
- Scrubbing dry bird droppings, insects or tree sap.
- Using a pressure washer too close to paint, seals, badges or sensors.
- Attempting intensive polishing without understanding paint correction.
Automatic washes can be convenient, but brush contact, chemical strength and equipment condition vary. Touchless washing reduces physical contact but may leave bonded grime behind, while waterless methods require enough lubrication and are not suitable for every level of dirt.
For local professional help, verify that a participating shop actually offers the service and accepts the request rather than relying only on a search label such as car advice near me options.
When DIY Maintenance Should Stop
Deep scratches, exposed metal, peeling clear coat and severe oxidation need professional assessment. Persistent etching or defects that remain after safe cleaning should not be attacked with increasingly aggressive products.
A professional can determine whether the vehicle needs paint correction, repainting or another repair. If a defect affects corrosion protection or exposes metal, delaying assessment may create a more expensive problem.
How Often Should You Maintain Your Car’s Exterior?
There is no universal washing interval for every vehicle. Adjust car exterior maintenance to road salt, pollution, parking location, driving frequency, weather and local water conditions, and remove aggressive contamination as soon as practical rather than waiting for a fixed date.
A quick contamination removal, a regular wash, a deeper decontamination and a protection refresh are different tasks. A vehicle parked outdoors near trees may need more prompt sap removal than a vehicle stored indoors, while winter driving increases the importance of rinsing salt from lower panels and the underbody.
A Flexible Car Exterior Maintenance Checklist
- After contamination appears: remove fresh bird droppings, bugs and tree sap safely.
- Regularly according to use and conditions: wash the exterior and clean the wheels and tires.
- Every few months or when protection weakens: inspect the finish, remove bonded contamination and refresh wax or sealant according to product instructions.
- Once or twice a year as needed: perform a deeper inspection and consider professional correction when defects exceed safe home care.
- During winter exposure: pay special attention to lower panels, wheel arches and the underside where salt can accumulate.
Protection should be judged by the condition of the surface rather than by a rigid calendar alone. Reduced water behavior, visible contamination or a dull finish may indicate that the cleaning and protection routine needs review.
Key Points
- 🧼 Pre-rinse first and wash the car from the roof downward.
- 🪣 Keep wheel tools separate from paint and glass tools.
- 💧 Dry promptly with clean microfiber to reduce water spots and friction.
- 🛡️ Apply protection only after safe cleaning and follow product instructions.
- 🔧 Refer deep scratches, etched paint and clear-coat failure to a professional.
Frequently Asked Questions About Car Exterior Care at Home
Is dish soap safe for car paint?
Dish soap is not the preferred product for regular car washing because it is formulated for household grease and may affect existing protection. Use a dedicated automotive shampoo that is compatible with the vehicle’s finish.
Can I wash my car in direct sunlight?
Direct sunlight can cause water, shampoo and chemical cleaners to dry before they are rinsed. Shade or a cooler time of day makes the process easier and can reduce streaks and mineral deposits.
What is the best way to remove bird droppings from a car?
Soften the deposit with a damp microfiber towel or compatible automotive cleaner before lifting it gently. Avoid dry rubbing, scraping, fingernails and abrasive pads because the contamination may contain particles that can mark the paint.
How can I prevent swirl marks when washing my car?
Pre-rinse the vehicle, use clean tools, separate wheels from bodywork, rinse the mitt frequently and make light passes over small sections. Careful drying also matters because dragging a dirty towel across wet paint can create marks.
Do I need to wax my car after every wash?
No fixed waxing interval suits every vehicle. The appropriate timing depends on the product, climate, parking conditions, washing routine and vehicle use, so follow the product instructions and refresh protection when its performance weakens.
The Final Home Car Exterior Care Checklist
A consistent, gentle routine is more valuable than aggressive products, rigid schedules or unnecessary detailing steps. Gather clean tools, select a cool washing location, rinse before contact and keep the dirtiest areas separate from the painted bodywork.
- Gather clean towels, wash mitts, buckets and surface-specific products.
- Pre-rinse the vehicle from the roof toward the lower panels.
- Clean wheels and tires with dedicated tools.
- Wash the body with the two-bucket method from top to bottom.
- Rinse every panel, gap, badge, mirror and trim piece.
- Dry gently with clean microfiber or suitable air.
- Remove fresh aggressive contamination promptly and carefully.
- Apply wax, sealant or ceramic spray only to a clean, dry surface.
- Stop and seek professional advice when the defect exceeds safe cleaning or protection.
Good car exterior care protects the condition you already have. It cannot guarantee a flawless finish, but it can reduce avoidable contamination, limit wash-related wear and help you recognize when a repair requires more than home maintenance.